Earthquake Retrofitting: Essential Steps Before Starting a Renovation
Earthquake Retrofitting: Essential Steps Before Starting a Renovation
Reading time: 14 minutes
Here’s a scenario that keeps homeowners up at night: You’ve finally saved enough to renovate your 1960s bungalow — new kitchen, open floor plan, maybe a master suite addition. The contractor is booked, the permits are pulled, and then your structural engineer drops a quiet bombshell: “Before we touch anything, we need to talk about your cripple walls.”
If you’ve never heard the term “cripple wall,” you’re already behind on one of the most critical conversations in residential construction today. Earthquake retrofitting — the process of strengthening an existing structure to better withstand seismic activity — isn’t just a California obsession anymore. As seismic risk maps are redrawn in 2026, homeowners across the Pacific Northwest, the Central United States, and even parts of the East Coast are discovering that their renovation projects can’t move forward responsibly without addressing structural vulnerabilities first.
The good news? Retrofitting doesn’t have to derail your renovation plans. In fact, when done strategically, it becomes the foundation — literally — upon which your entire renovation pays off more safely, more durably, and often with better resale value.
Let’s cut through the confusion and give you a precise, actionable roadmap.
Table of Contents
- Why Retrofitting Must Come Before Renovation
- Assessing Your Home’s Seismic Risk in 2026
- Common Structural Vulnerabilities to Address
- Key Retrofitting Methods Explained
- Cost vs. Risk: The Numbers Breakdown
- Real-World Case Studies
- Permits, Professionals, and the Process
- Frequently Asked Questions
- Your Retrofit-First Roadmap: Next Steps
Why Retrofitting Must Come Before Renovation
Think of your home like a chain — it’s only as strong as its weakest link. When you renovate before retrofitting, you’re essentially hanging expensive new fixtures on a chain that could snap in the next major seismic event. Worse, certain renovations — like removing walls, adding heavy tile floors, or expanding the roofline — can actually increase seismic vulnerability if the underlying structure hasn’t been reinforced.
According to the Federal Emergency Management Agency (FEMA), approximately 143 million Americans currently live in areas with significant seismic hazard as of 2026. Updated U.S. Geological Survey (USGS) National Seismic Hazard Models, revised in 2023 and refined through 2025, now incorporate induced seismicity — earthquakes triggered by industrial activities like wastewater injection — which has dramatically expanded the risk footprint into states like Oklahoma, Kansas, and Arkansas.
“The biggest mistake we see is homeowners investing $80,000 in a beautiful renovation on a home that still has an unbolted mudsill. One moderate earthquake and that investment can shift right off the foundation.” — Dr. Janelle Cortez, Structural Engineer and ASCE Fellow, 2025 Pacific Earthquake Engineering Research Conference
The sequencing is non-negotiable for three key reasons:
- Safety first: Retrofitting addresses life-safety vulnerabilities that a renovation simply can’t fix retroactively.
- Cost efficiency: Combining retrofitting and renovation work — especially when walls are already open — can reduce total labor costs by 20–35%.
- Code compliance: In California, Oregon, Washington, and increasingly in other states, certain renovation scopes now legally trigger seismic upgrade requirements under local building codes.
Assessing Your Home’s Seismic Risk in 2026
Start With a Professional Seismic Evaluation
Before any contractor swings a hammer, you need a clear-eyed understanding of where your home stands seismically. A professional seismic evaluation — performed by a licensed structural engineer with seismic expertise — is your starting point. This is different from a standard home inspection. General home inspectors may flag obvious structural issues, but they’re rarely trained to identify the specific failure modes that earthquakes exploit.
A qualified seismic evaluation typically includes:
- Review of original construction documents (if available)
- On-site assessment of the foundation type and condition
- Inspection of cripple walls, mudsills, and anchor bolts
- Evaluation of soft-story conditions (especially in multi-family or split-level homes)
- Assessment of chimney, water heater, and utility connections
- Soil type determination (liquefaction risk in soft soils)
In 2026, several cities — including Los Angeles, Seattle, and Portland — offer subsidized or free preliminary seismic assessments for qualifying homeowners. The California Earthquake Authority’s (CEA) Brace + Bolt program, now in its eighth year, has helped over 23,000 homeowners access retrofit funding, with expanded eligibility criteria as of January 2026.
Use Digital Tools as a First Screen
Before scheduling a professional evaluation, you can use digital resources as a preliminary screen:
- USGS Earthquake Hazards Program (earthquake.usgs.gov): Enter your address to see probabilistic ground shaking hazard maps.
- FEMA’s Hazus software: Now available as a cloud-based tool in 2026, it provides community-level loss estimates for planning purposes.
- Your state’s geologic survey website: Many states publish liquefaction and landslide susceptibility maps that are critical for site-specific risk assessment.
These tools don’t replace professional judgment, but they give you a credible baseline before your first engineering consultation — and they help you ask smarter questions.
Common Structural Vulnerabilities to Address
Not all homes are equally at risk, and not all vulnerabilities are equally dangerous. Here’s a breakdown of the most critical issues engineers look for, particularly in homes built before 1980:
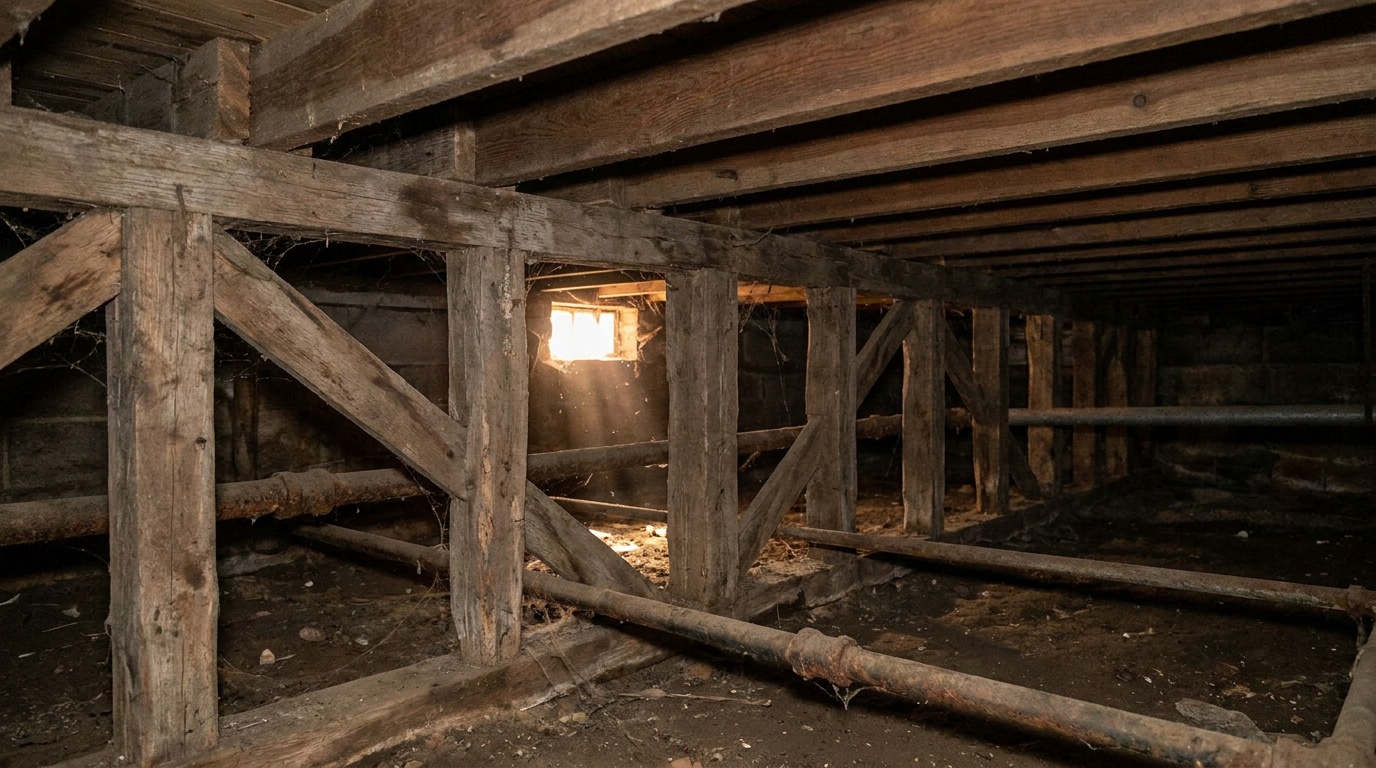
Cripple Walls: The Hidden Danger
Cripple walls are short wood-framed walls that sit between the foundation and the first floor of a house. They exist to create a level platform when the ground isn’t perfectly flat — but they were historically built without adequate diagonal bracing. During an earthquake, these walls can collapse like dominoes, causing the entire house to slide or drop off the foundation.
The fix — adding plywood sheathing to cripple walls and bolting them to the foundation — is relatively inexpensive ($3,000–$10,000 depending on home size) and enormously effective. FEMA estimates that properly retrofitted cripple walls can reduce the probability of major structural damage by up to 50% in moderate earthquakes.
Unbolted or Underbolted Mudsills
The mudsill (also called a sill plate) is the bottom horizontal member of the wood frame that sits directly on the concrete foundation. In homes built before the 1940s, and even some built through the 1970s, these mudsills were often placed without anchor bolts — or with bolts that are now corroded, undersized, or spaced too far apart.
Without proper anchoring, the entire wood frame can slide off the foundation during ground shaking. Adding anchor bolts — or more commonly today, Simpson Strong-Tie-style holdown devices — is a core component of most residential retrofits.
Soft-Story Conditions
A soft story is a building level that is significantly weaker or more flexible than the floors above it. This is most common in:
- Multi-family buildings with parking garages on the ground floor
- Homes with large open-concept ground floors and bedrooms above
- Split-level homes with garages built into the hillside
Soft-story buildings are dramatically over-represented in earthquake casualty statistics. The 1994 Northridge earthquake and the 2011 Christchurch, New Zealand earthquake both demonstrated catastrophic soft-story collapses. As of 2026, Los Angeles has mandated retrofits for thousands of wood-frame soft-story buildings under its mandatory retrofit ordinance, with compliance deadlines now fully enforced.
Unreinforced Masonry (URM) Chimneys and Walls
Brick and unreinforced masonry are among the most dangerous materials in a seismic event. Chimneys frequently collapse, falling through roofs or onto adjacent areas. URM walls can disintegrate suddenly. If your home has a brick chimney or brick exterior walls without internal steel reinforcement, these must be evaluated — and often partially or fully rebuilt — as part of any serious renovation project.
Key Retrofitting Methods Explained
Retrofitting isn’t one-size-fits-all. The right approach depends on your home’s construction type, foundation, soil conditions, and local code requirements. Here are the primary methods in use today:
Foundation Bolting and Cripple Wall Bracing (FEMA P-1100 / Brace+Bolt Method)
This is the most common retrofit for wood-frame homes on crawl spaces. It combines mudsill anchor bolting with plywood sheathing on cripple walls. This method follows FEMA P-1100 guidelines, the 2020 standard that remains the gold standard in 2026.
Base Isolation
Used primarily in commercial and historic buildings, base isolation places the structure on flexible bearings that absorb seismic energy before it reaches the building. Costs range from $150,000 to over $1 million for residential applications, making it rare for standard homes but increasingly relevant for high-value properties in extreme hazard zones.
Shear Walls and Moment Frames
For soft-story conditions or open-plan layouts, engineers often specify the addition of shear walls (plywood or steel-reinforced wall panels) or steel moment frames (rigid steel connections that resist lateral forces). These are more invasive to install but provide substantial performance improvements.
Concrete Encapsulation and Foundation Replacement
Older homes on deteriorated concrete or rubble stone foundations may require partial or complete foundation replacement. This is the most expensive option — often $20,000 to $80,000+ — but it’s sometimes the only viable path for very old structures.
Cost vs. Risk: The Numbers Breakdown
One of the most common objections to retrofitting is cost. But frame it against the alternative — and the math becomes clarifying.
Retrofit Cost vs. Potential Loss: Horizontal Comparison
The visual above tells a stark story. A standard cripple wall retrofit averaging $6,000 is a rounding error compared to the cost of major structural earthquake repair — which FEMA estimates averages $120,000 for moderate damage events — let alone total loss scenarios.
And don’t assume your homeowner’s insurance has you covered. Standard homeowner’s policies in the United States do not cover earthquake damage. Separate earthquake insurance carries deductibles of 10–20% of the home’s insured value. On a $750,000 home, that’s a $75,000–$150,000 out-of-pocket expense before insurance pays a single dollar.
Comparative Retrofit Options at a Glance
| Retrofit Method | Typical Cost Range | Best For | Disruption Level | Risk Reduction |
|---|---|---|---|---|
| Cripple Wall Bracing + Bolting | $3,000–$10,000 | Pre-1980 wood-frame homes | Low (crawl space access) | Up to 50% |
| Soft-Story Steel Frame | $20,000–$60,000 | Multi-family, open ground floors | High (interior work) | 60–80% |
| Foundation Replacement | $20,000–$80,000+ | Deteriorated or rubble foundations | Very High | Structural baseline reset |
| Shear Wall Addition | $8,000–$25,000 | Homes with large openings/windows | Moderate | 40–65% |
| Base Isolation | $150,000+ | High-value or historic buildings | Extreme | Up to 90% |
Real-World Case Studies
Case Study 1: The Berkeley Bungalow That Survived
In 2024, the Tanaka family in Berkeley, California, began a major kitchen and bathroom renovation on their 1952 wood-frame bungalow. Their contractor — a forward-thinking GC with seismic experience — insisted on a structural engineer visit before demolition began. The engineer discovered an unbolted mudsill along the rear of the foundation and severely deteriorated cripple walls on the south side of the crawl space.
The Tanakas invested $8,200 in a combined bolting and cripple wall retrofit before the renovation began. Fourteen months later, in February 2025, a M5.1 earthquake centered near Pleasanton caused visible damage to several neighboring homes — cracked driveways, chimney collapses, and one home that shifted noticeably on its foundation. The Tanaka home: zero structural damage. Their renovation investment, now completed, is intact and their home’s appraised value has increased an estimated $55,000 above comparable unreinforced properties in their neighborhood.
Case Study 2: The Seattle Soft-Story Lesson
A 1968 four-unit apartment building in Seattle’s Capitol Hill neighborhood went through a cosmetic renovation in 2022 — new siding, updated kitchens, fresh landscaping. The building had an open-front parking garage on the ground level — a classic soft-story configuration. The owners skipped a structural evaluation to keep costs down.
During the February 2026 M4.8 Puget Sound earthquake event, the building sustained significant racking damage to its ground-floor garage opening. Two ground-floor walls cracked severely and one tenant unit became uninhabitable for three months. Repair costs totaled $47,000 — not covered by standard property insurance. A soft-story retrofit quoted in 2022 would have cost approximately $28,000. The math speaks for itself.
Permits, Professionals, and the Process
Navigating Permits for Seismic Retrofit Work
Seismic retrofit work almost always requires building permits — and for good reason. Structural modifications that affect life safety need to be reviewed and inspected by qualified building officials. Skipping permits on retrofit work is not just legally risky; it can void your insurance, create problems at resale, and leave you with work that hasn’t been verified for code compliance.
The good news in 2026: many jurisdictions have streamlined the permit process specifically for standard residential retrofits. California’s Division of State Architect offers over-the-counter permit approval for projects following the prescriptive FEMA P-1100 guidelines, often with same-day turnaround. Oregon and Washington have similar expedited pathways as of 2025 updates to their residential construction codes.
Practical tip: When you pull permits for your renovation, ask your building department specifically whether your scope of work triggers mandatory seismic upgrades. Many jurisdictions have “substantial improvement” thresholds — often 50% of assessed structure value — that legally require bringing the building up to current seismic standards. Knowing this in advance lets you budget properly rather than discovering mid-project.
Choosing the Right Professionals
You’ll interact with at least two types of professionals in a retrofit-informed renovation:
- Structural Engineer (SE or PE with structural specialization): Essential for the evaluation and design of retrofit measures. Look for engineers with specific seismic experience and familiarity with residential retrofit programs in your state. The Structural Engineers Association of California (SEAOC) and similar state organizations maintain referral directories.
- Licensed General Contractor with Seismic Experience: Not every GC knows how to execute a retrofit correctly. Ask specifically for references on retrofit projects, and confirm they’ve worked with your engineer’s specification type before.
In 2026, several states — including California, Oregon, and Washington — now offer contractor certification programs specifically for residential seismic retrofitters. Look for contractors who hold these certifications. They’ve completed training on the latest FEMA guidelines and are more likely to catch field conditions that standard GCs might miss.
Red flag: Be extremely cautious of contractors who offer seismic retrofits without requiring any engineering review. Prescriptive methods like FEMA P-1100 can be self-engineered for standard conditions, but any unusual site condition — sloped lot, hillside construction, unconventional framing — requires licensed engineering oversight.
Frequently Asked Questions
Do I legally have to retrofit my home before renovating?
It depends on your location and the scope of renovation. In many California cities, Oregon counties, and Washington jurisdictions, building codes contain “trigger” provisions that require seismic upgrades when a renovation exceeds a certain cost threshold — typically 50% of the structure’s assessed value. Even where not legally required, best practice strongly recommends a seismic evaluation before any structural renovation work begins. Your building department can tell you exactly what thresholds apply to your specific project address.
How long does a typical residential seismic retrofit take?
For a standard cripple wall and mudsill bolting retrofit on a single-family home, expect 2–5 days of actual construction work after permits are obtained. More complex projects — soft-story reinforcement, shear wall additions, or foundation work — can take 3–8 weeks. When coordinated with an ongoing renovation, the timeline impact is often minimal because the retrofit work can be completed while other phases are in early stages, especially if interior walls are already open for renovation access.
Will retrofitting increase my home’s resale value?
Yes — and increasingly so. A 2025 study published by the National Association of Realtors found that documented seismic retrofits added an average of 4–8% to home values in high-seismic-hazard ZIP codes, with the premium rising in areas that experienced recent seismic events. Beyond direct value, retrofitted homes are significantly easier to sell in seismic zones because savvy buyers and their inspectors increasingly request retrofit documentation. Some lenders in California and Washington now require seismic retrofit documentation for jumbo loans on older homes in high-hazard areas.
Your Retrofit-First Roadmap: Next Steps
You now have the framework. Here’s how to move from information to action — in the right order:
- Screen your risk (Week 1): Use USGS hazard maps and your state’s geologic survey resources to understand your baseline seismic risk. Note your home’s construction year — pre-1980 is a key threshold.
- Commission a seismic evaluation (Weeks 2–4): Hire a licensed structural engineer with seismic retrofit experience before signing any renovation contracts. Budget $500–$2,000 for this evaluation. It’s the most valuable money you’ll spend.
- Explore financial assistance (Weeks 3–5): Check your state’s earthquake retrofit grant and loan programs. California’s Brace + Bolt, Oregon’s Seismic Rehabilitation Grant Program, and Washington’s programs have expanded eligibility in 2026. You may qualify for grants covering 25–100% of basic retrofit costs.
- Coordinate retrofit with renovation design (Weeks 4–8): Bring your structural engineer’s retrofit specifications to your architect and GC early. Design the renovation around the retrofit — not the other way around. This is where you capture the 20–35% cost savings from doing both projects simultaneously.
- Execute in the right sequence: Pull retrofit permits first or simultaneously with renovation permits. Complete structural retrofit work before finishing walls, floors, or any cosmetic elements. Verify all work with required inspections.
Seismic retrofitting sits at the intersection of two powerful trends reshaping homeownership in 2026: the growing awareness of climate and disaster risk, and the increasing scrutiny of building resilience in real estate transactions. Homes that are measurably safer aren’t just more livable — they’re becoming more financially valuable and easier to insure, sell, and finance.
Your renovation is an opportunity, not just to update your kitchen or expand your living space, but to genuinely future-proof your most valuable asset. Don’t let budget pressure or timeline anxiety push you into skipping the structural foundation of that investment.
The question worth sitting with as you plan your project: If a significant earthquake happened the day after your renovation was complete, would your investment still be standing — and would your family be safe inside it?
Article reviewed by Pablo Reyes, Wood Flooring Installation & Restoration Expert, on May 4, 2026
